Cherry Pie Bars – Easy Homemade Cherry Dessert Recipe
(Formatted clean for WordPress, no divider lines, no bold text, paragraphs separated with spaces only)
Cherry Pie Bars – Easy Homemade Cherry Dessert Recipe
Cherry Pie Bars are one of those irresistible desserts that instantly bring comfort, sweetness, and a touch of nostalgia to your table. Combining the classic flavor of cherry pie with the simplicity of a handheld bar, this recipe is perfect for busy bakers, family gatherings, and anyone who loves a fruity dessert without the hassle of making a traditional pie crust. These bars are buttery, soft, slightly crisp on the edges, and layered with a rich, sweet-tart cherry filling that melts in your mouth with every bite.
What makes Cherry Pie Bars truly special is their versatility and ease. Unlike traditional pies that require careful rolling and shaping, these bars are made using a simple batter that doubles as both the base and the topping. This means less time in the kitchen and more time enjoying a delicious homemade dessert. Whether you’re baking for a holiday, a picnic, or just to satisfy your sweet cravings, these cherry bars deliver bakery-quality results with minimal effort.
The flavor profile is beautifully balanced. The sweetness of the dough pairs perfectly with the slightly tangy cherries, creating a dessert that isn’t overly sugary. The addition of a light glaze on top adds a finishing touch that enhances both the look and taste of the bars. Each square is rich, moist, and bursting with fruity goodness, making it hard to stop at just one.
Cherry Pie Bars are also ideal for sharing. They’re easy to slice, transport, and serve, which makes them a favorite for potlucks, bake sales, and family events. Plus, they store well, so you can make them ahead of time and enjoy them throughout the week. Whether served warm with a scoop of ice cream or enjoyed cold with a cup of coffee, these bars are guaranteed to impress.
Why You’ll Love This Recipe
One of the main reasons people fall in love with Cherry Pie Bars is their simplicity. You don’t need advanced baking skills or special equipment to achieve perfect results. Everything comes together in one bowl, and the process is straightforward and beginner-friendly.
Another reason is the texture. These bars have a soft, cake-like base with slightly crisp edges and a juicy fruit layer that keeps them moist and flavorful. The topping bakes into a golden, slightly crumbly layer that adds just the right amount of contrast.
The recipe is also highly customizable. While cherry filling is the classic choice, you can easily swap it out for other fruits like blueberry, strawberry, or apple. This flexibility allows you to use what you have on hand or adapt the recipe to your personal preferences.
Ingredients
For the bars
1 cup unsalted butter, softened
2 cups granulated sugar
4 large eggs
1 teaspoon vanilla extract
3 cups all-purpose flour
1 teaspoon salt
1 can (about 21 ounces) cherry pie filling
For the glaze
1 cup powdered sugar
2 to 3 tablespoons milk
1 teaspoon vanilla extract
Instructions
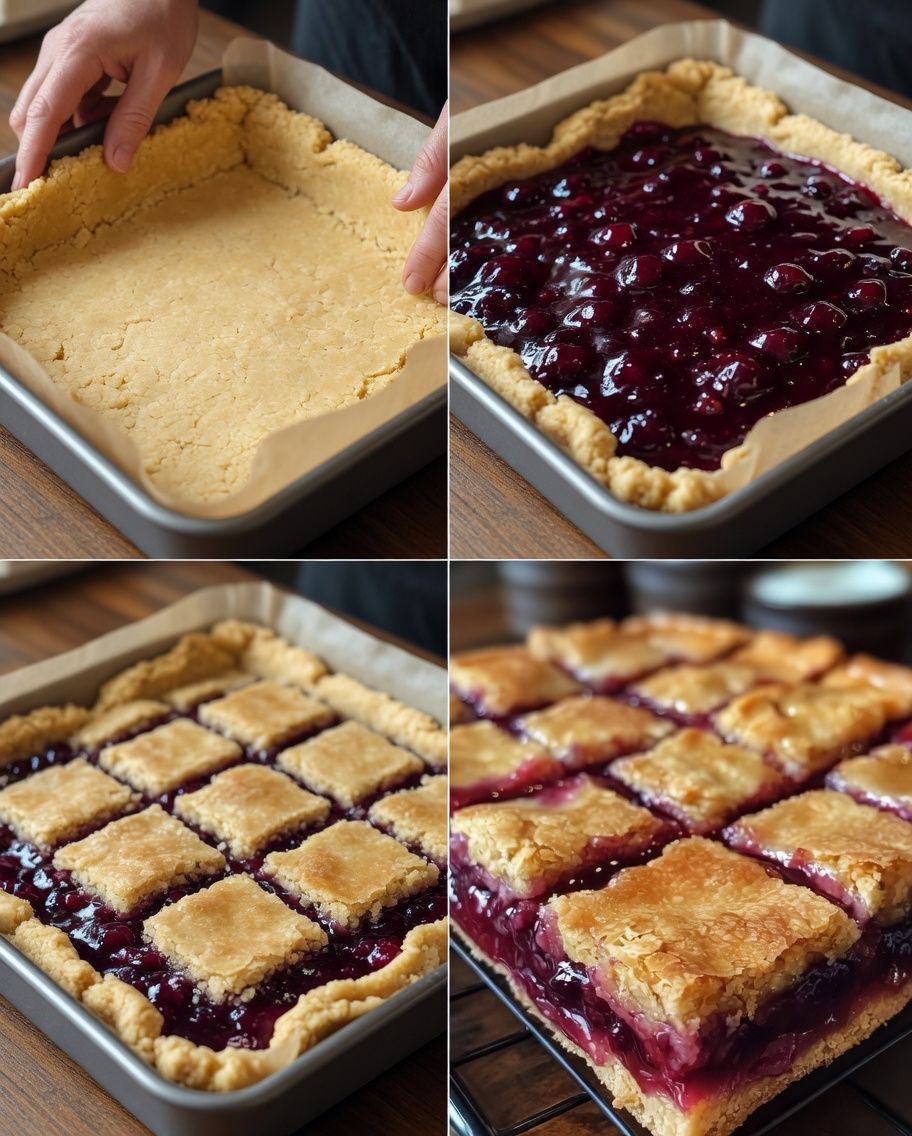
Preheat your oven to 175°C (350°F). Grease a 9×13-inch baking pan or line it with parchment paper for easy removal.
In a large mixing bowl, cream together the butter and sugar until the mixture becomes light and fluffy. This step is important because it helps create the soft and tender texture of the bars.
Add the eggs one at a time, mixing well after each addition. Stir in the vanilla extract until fully combined.
Gradually add the flour and salt to the mixture. Mix until a smooth and thick batter forms. Be careful not to overmix, as this can affect the final texture.
Spread about two-thirds of the batter evenly into the prepared baking pan. Use a spatula to smooth it out into an even layer.
Spoon the cherry pie filling over the batter, spreading it evenly across the surface.
Drop the remaining batter in small spoonfuls over the cherry layer. It doesn’t need to cover everything completely, as it will spread slightly during baking.
Bake in the preheated oven for 35 to 40 minutes, or until the top is lightly golden and set.
Remove from the oven and allow the bars to cool completely in the pan before adding the glaze.
To make the glaze, whisk together the powdered sugar, milk, and vanilla extract until smooth. Drizzle it over the cooled bars.
Once the glaze has set, cut into squares and serve.
Tips for Perfect Cherry Pie Bars
Always use room temperature ingredients, especially butter and eggs. This helps create a smoother batter and ensures even mixing.
Do not skip greasing or lining your pan. This step makes it much easier to remove the bars without breaking them.
Let the bars cool completely before cutting. Cutting them too early can cause them to fall apart.
If you prefer a less sweet dessert, you can reduce the sugar slightly or use a tart cherry filling.
Variations
You can easily change the flavor of these bars by using different pie fillings. Blueberry, raspberry, peach, or apple fillings all work beautifully with the same base recipe.
For a richer flavor, try adding a teaspoon of almond extract to the batter. It pairs especially well with cherries.
If you like a bit of crunch, sprinkle chopped nuts such as almonds or pecans on top before baking.
Serving Suggestions
Cherry Pie Bars can be served in many ways depending on the occasion. For a simple treat, enjoy them as they are with a cup of tea or coffee. For a more indulgent dessert, serve them warm with a scoop of vanilla ice cream or a dollop of whipped cream.
They also make a great addition to dessert platters, especially when paired with other baked goods like brownies or cookies.
Storage
Store the bars in an airtight container at room temperature for up to three days. If you want to keep them longer, you can refrigerate them for up to a week.
These bars also freeze well. Wrap them individually or store them in a freezer-safe container for up to three months. Thaw at room temperature before serving.
Conclusion
Cherry Pie Bars are the perfect combination of convenience and classic flavor. They capture everything we love about cherry pie in an easy-to-make, shareable form. With their soft, buttery base, rich cherry filling, and sweet glaze, these bars are sure to become a favorite in your recipe collection.
Whether you’re baking for a special occasion or just want to treat yourself and your family, this recipe delivers delicious results every time. Once you try it, you’ll find yourself coming back to it again and again, experimenting with different flavors and making it your own.
If you enjoyed this recipe, be sure to share it with friends and family and save it for later. Happy baking!